Effective inspection data management is a critical component for companies seeking to successfully implement a digital transformation in manufacturing inspection program. Most companies making this transition are attempting to effectively manage, analyze and share vast amounts of visual and sensor inspection data, captured via a variety of devices such as video cameras, UAVs, mobile phones, IIoT sensors and more. Effectively leveraging this valuable data to achieve their digital transformation in manufacturing goals is the challenge, as this data is mostly unstructured and difficult to parse without extracting and harnessing the power of the metadata.
This is where the Optelos inspection data management platform offers assistance, as we have the US patent (US Patent No: 10,418,068) that enables our software to read and extract the metadata from images captured via drone (time stamp, precise GPS coordinates, telemetry data), and use that information to organize and intelligently present the information for review and analysis. This makes accessing and leveraging inspection imagery much faster and more intuitive, as the image and sensor data can be shown on a map to easily show where the image or sensor readings were taken, ensuring you find the right image every time. For organizing images of highly similar infrastructure, such as transport pipelines and utility power lines, this can be a game changer.
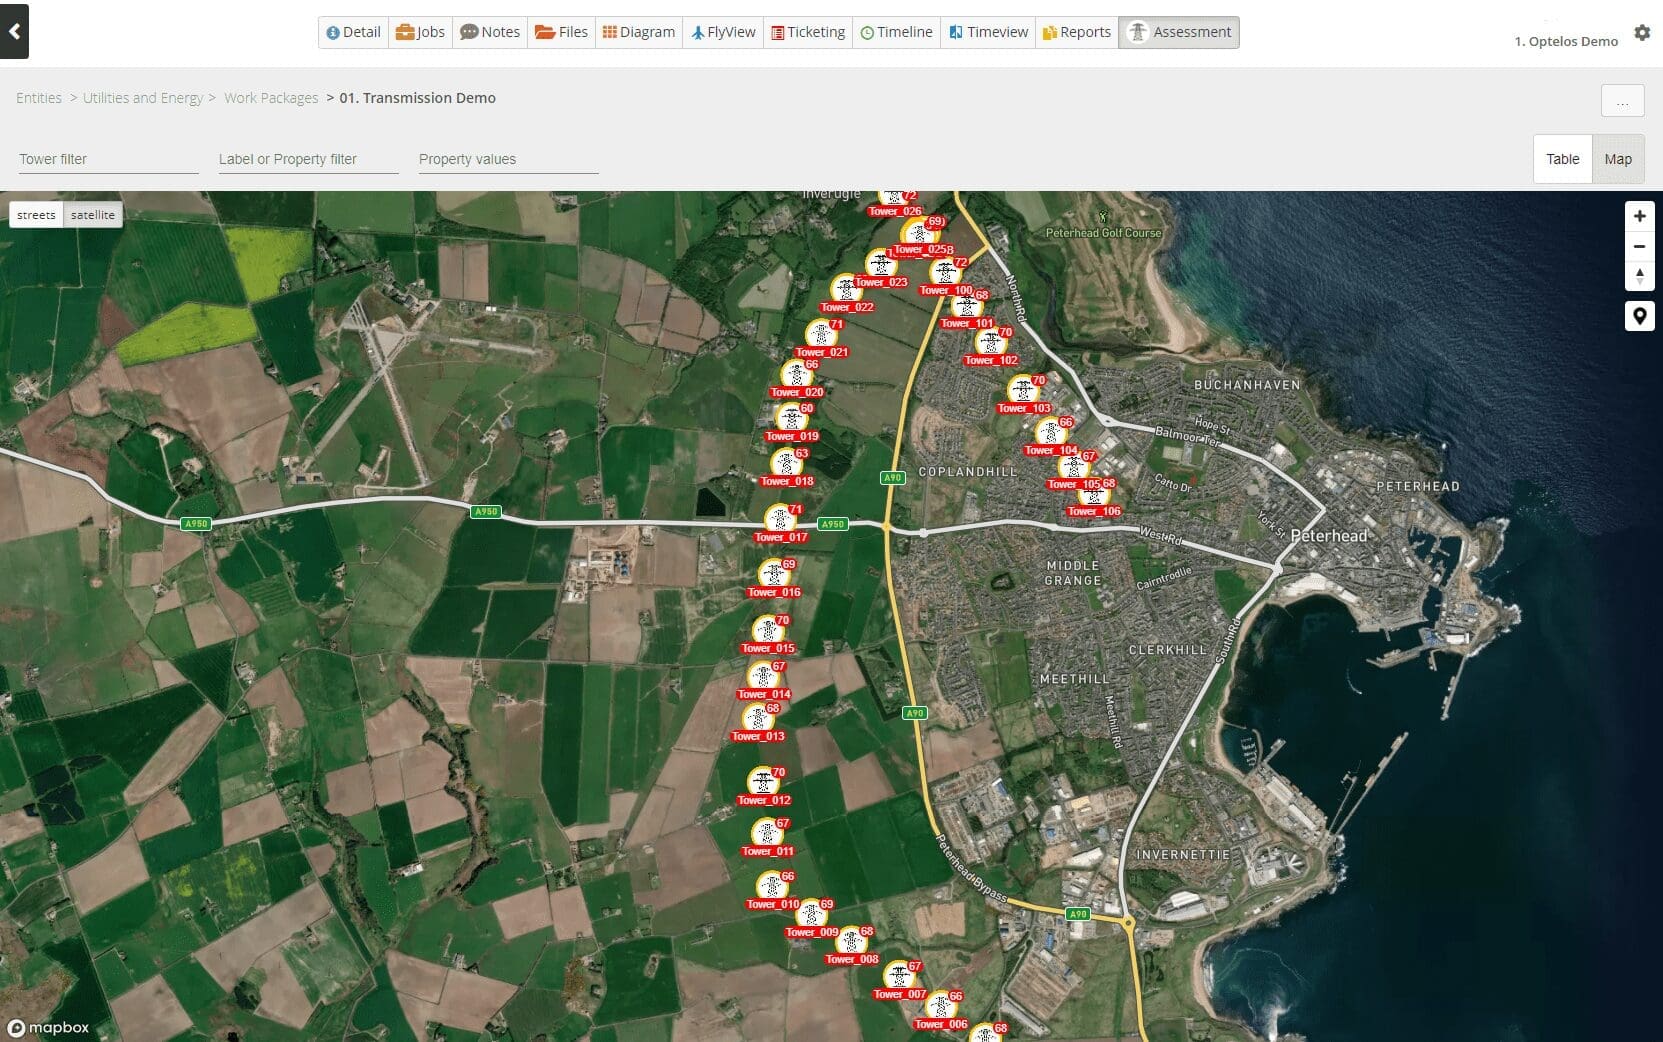
Figure 1: Our patent grants Optelos the ability to extract metadata to plot the precise location, time stamp and telemetry data from drone images.
Incorporating 3D Digital Twins into manufacturing inspection programs is also increasing at a rapid rate, given the many benefits afforded by this technology. Fueled by the evolution of drone hardware, improving sensor technology, faster cloud storage and resulting higher-resolution 3D digital twin models, the use of 3D Digital Twins has become standard practice for digital transformation in manufacturing inspection applications such facilities inspections, shutdown, turnaround and outage preparations, and safety & compliance inspections just to name a few.
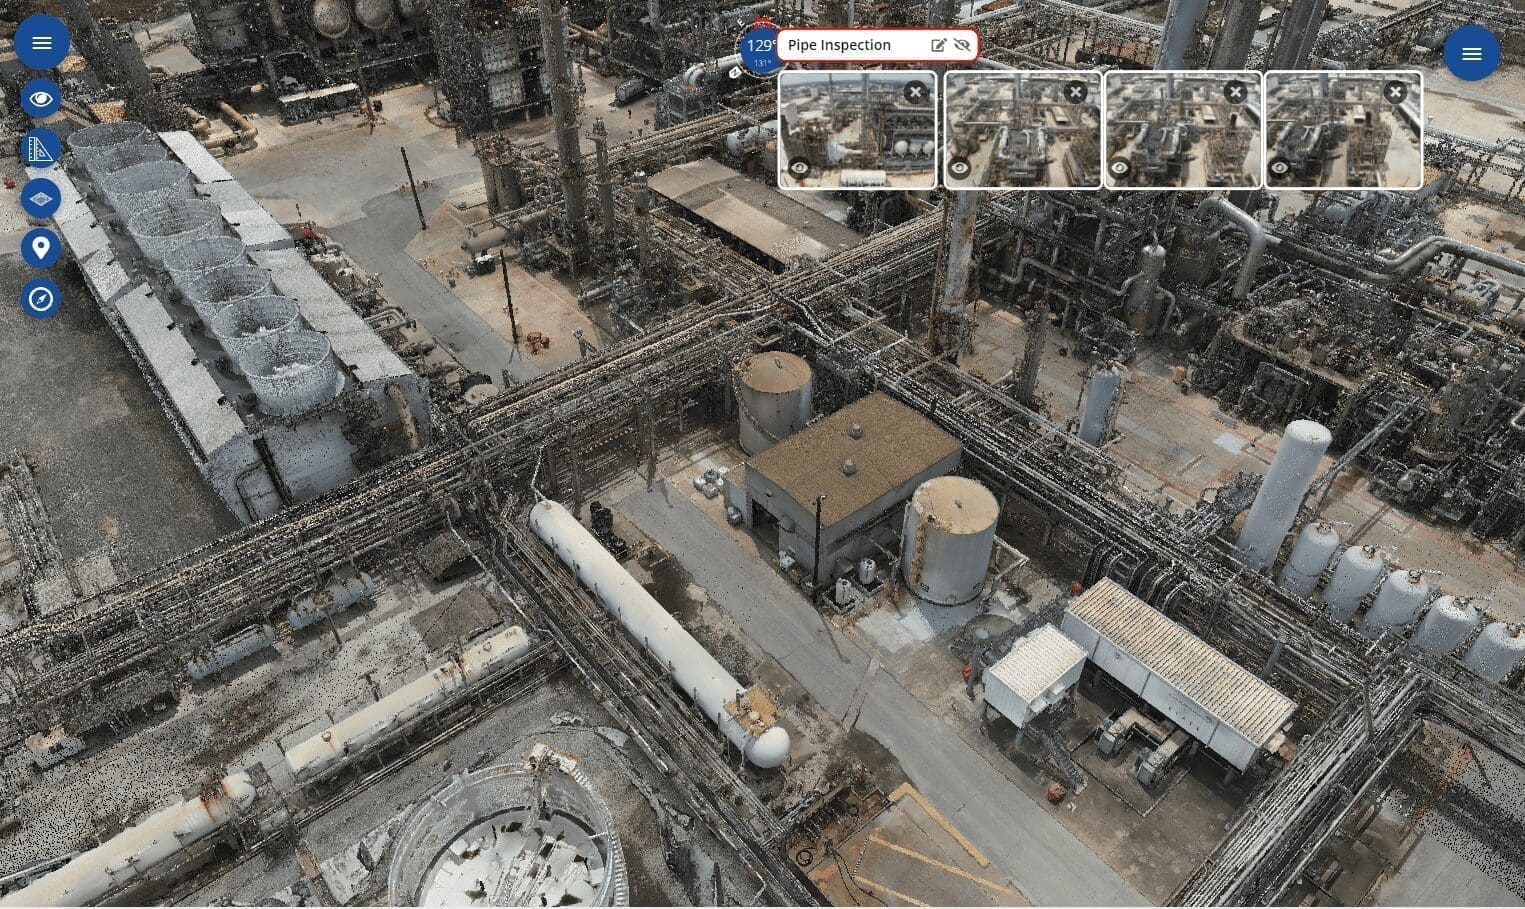
Figure 2: 3D Digital Twin models can be effectively utilized to perform detailed asset inspections and measurements with 1 mm accuracy.
And you don’t need to look far to see the powerful benefits of 3D Digital Twin visualizations that come from UAV drone inspections:
- INCREASED WORKER SAFETY – Drone-based inspections take inspectors out of dangerous environments such as elevated, confined space and hazardous conditions. Inspectors and field crews are able to perform more frequent inspections while increasing overall safety.
- COST SAVINGS – The time and expense to perform elevated inspections are significantly reduced simply by putting drones to use to create 3D Digital Twins to complete inspections. Companies avoid inherently dangerous situations and the construction of expensive and time-consuming scaffolding or required asset shutdowns. Further, the model is available online for ongoing reference, third party review, further planning and budgeting purposes.
- ENHANCED COLLABORATION – 3D Digital Twin models can be securely shared with distributed teams and third-party vendors through inspection data management software such as Optelos. Perform detailed analysis of the inspection results, share insights and issues with key stakeholders to drive faster, more accurate decisions.
Avoiding the pitfalls: If drone-based inspections make so much financial sense, why are some companies failing to embrace this new drone-based digital transformation in manufacturing technology? Based on our conversations with many of the world’s largest companies conducting infrastructure inspections, it often comes down to 5 key issues:
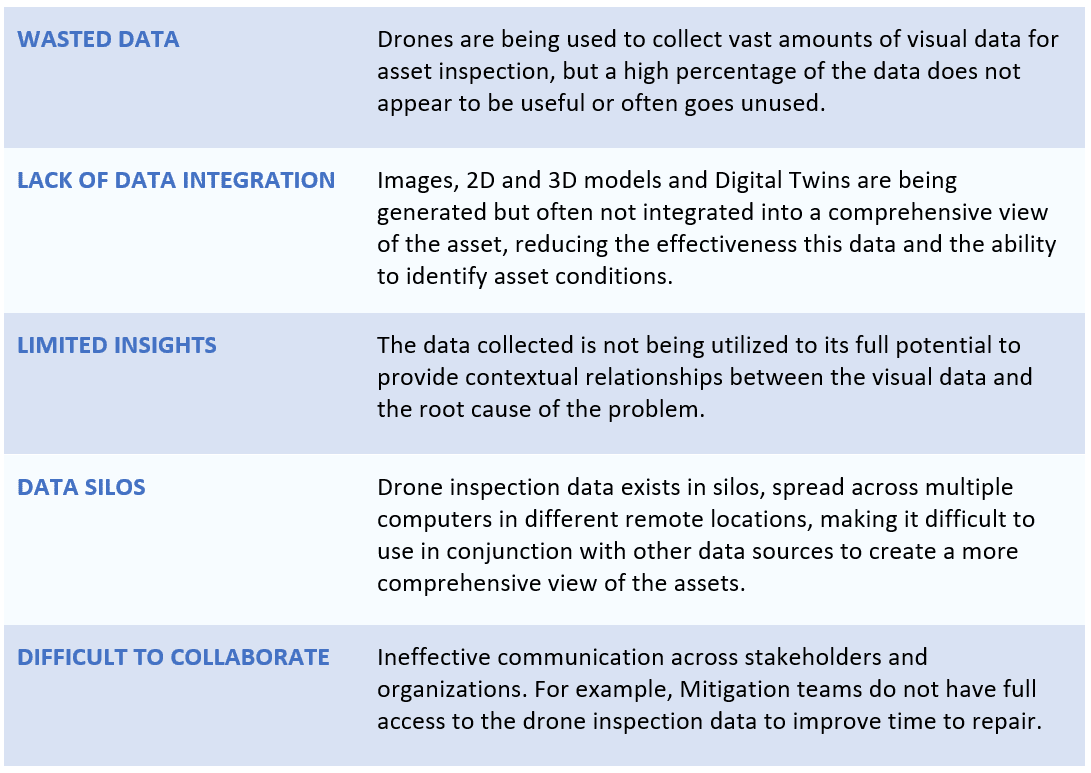
In order to maximize the value of their captured drone inspection data and enable a smoother implementation of a digital transformation in manufacturing program, companies should follow these 6 best practices:
- Identify the specific objectives of your inspection program
- Implement effective inspection data management
- Leverage data collection best practices
- Utilize the data type best suited for the objective
- Analyzing your data for insights and decisions
- Workflow integration and organizational adoption
- Identify the specific objectives of your inspection program: Too many organizations implement a drone-based digital transformation in manufacturing inspection program based on the perceived benefits it will bring in inspector safety and reduced inspection cost, but fail to dive one step deeper to identify the specific improvements they are trying to achieve. This is a critical first step, since every asset type or targeted improvement requires unique program elements in order to achieve optimal results. It is also critical to ensure that there are measurement mechanisms in place to ensure improvements are occurring and enable ongoing adjustments to be made to the program.
- Implement effective inspection data management: All the issues noted above in the “Pitfalls” section can be solved by selecting a robust and scalable inspection data management system such as Optelos, designed to handle and organize unstructured visual and sensor inspection data. This yields a “single pane of glass” solution to store, manage, process, visualize, analyze and share all forms of data; whether this be visual, non-visual, drone or non-drone information. As the program drone inspection program gains momentum, a unified platform allows multiple workgroups to interact and share their specific key insights from the data. One of the most critical issues is properly geolocating all of this data so that it can ultimately be used to create a complete view of the specific asset, so that proper identification and mitigation actions can be performed. Manufacturing inspection management software solutions like Optelos provide stakeholders with a way to visualize and act on all this data for effective and comprehensive asset management, including complex 3D models, maps, panoramas, videos, and other data formats, all in a single platform. This eliminates the need for disparate systems to view, measure, analyze and share all that data. The power of the data lies in the ability of the organization to securely and effectively use it to solve problems. This means making the data accessible to inspectors, site managers, 3rd party contractors, EH&S personnel and others who can use it to their advantage.
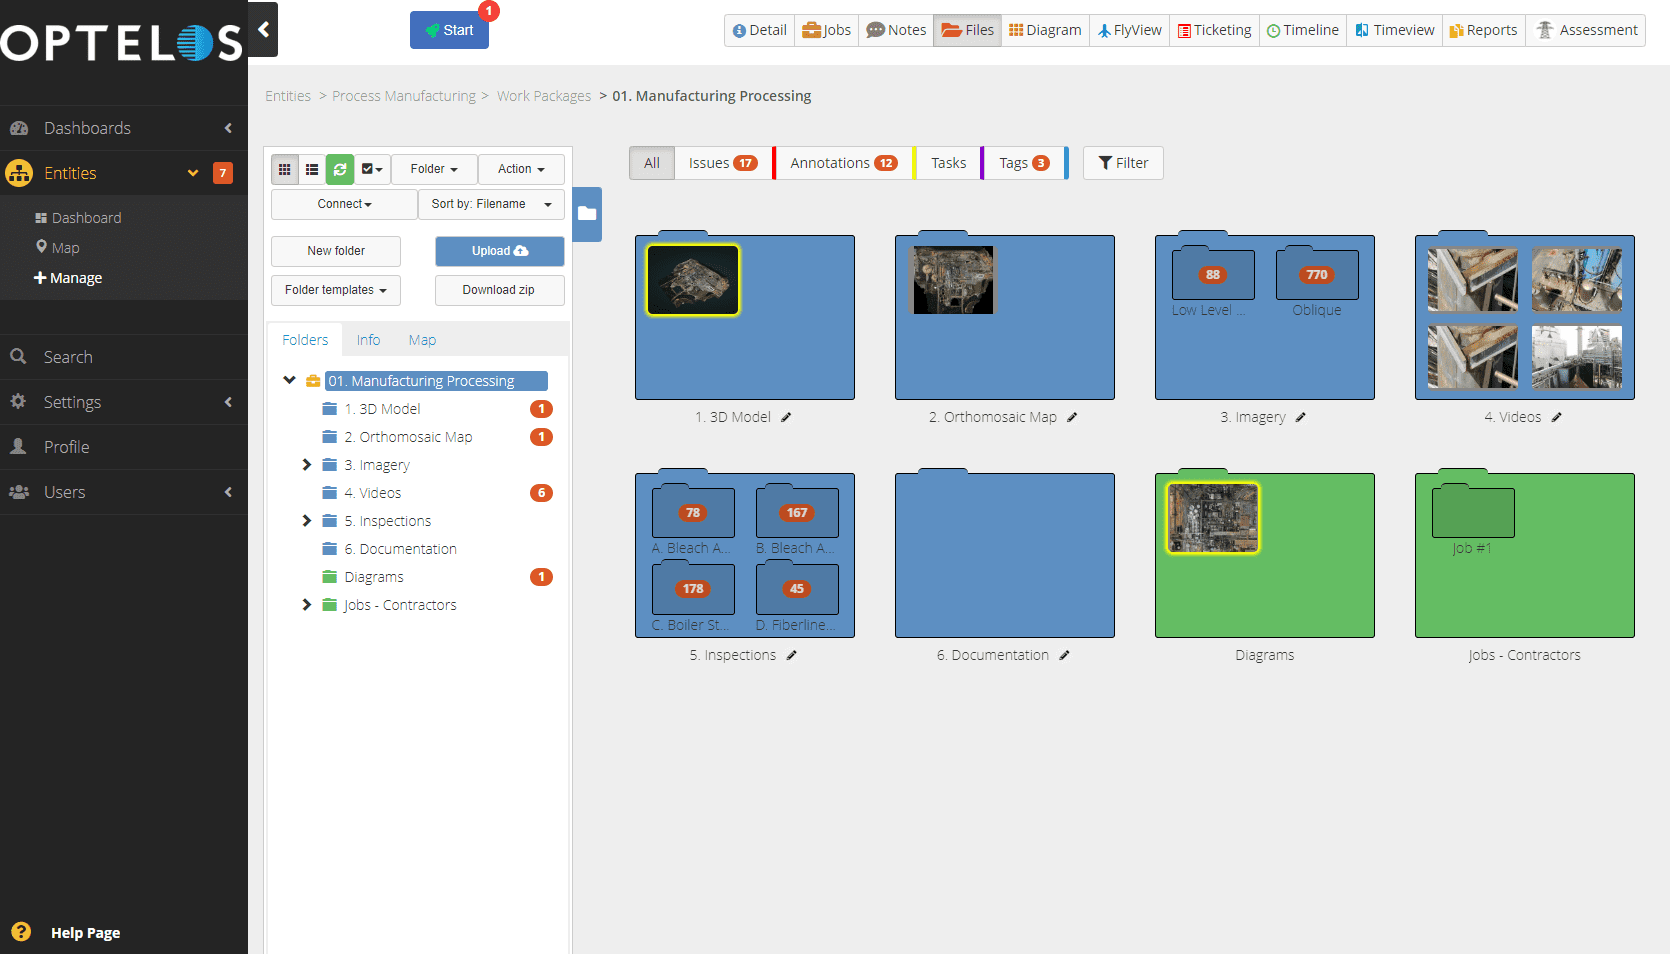
Figure 3: The Optelos Inspection Data Management System improves team collaboration and data leverage by organizing vast amounts of unstructured inspection information into an intuitive, contextualized and searchable database.
- Leverage data collection best practices: There is no “one size fits all” when it comes to data collection. Images need to be collected in a manner consistent with the desired outcome and asset type being inspected. For example, Flare Stacks and other vertical assets require different flight paths than pipelines and other horizontal assets. Using the optimal flight path and technique based on asset type will yield optimal results. If you are unsure of how to fly your assets to achieve optimal results, Optelos offers turnkey drone inspection services, including model construction and data hosting services, that deliver best-in-class results to enterprise customers with a 100% satisfaction guarantee.
- Utilize the data type best suited for the objective: It is important to use the data type that provides the most meaningful results for the desired inspection outcome. Different data types are best suited for a particular type of analysis. Standard photogrammetry, LiDAR, and thermal all have their specific use cases. In cases where temperature variations can identify emerging non-visual defects, then thermal imagery is the best choice for identifying such conditions. Based on the sensor type, thermal imagery can be used to detect pipeline or tank leaks as well as various hydrocarbon leaks, in addition to thermal variations. Other data source can be used in similar ways. When inspecting pipelines, flare stacks or other assets for corrosion or dimensional variations, standard photogrammetry using a high-resolution camera or LiDAR are often the best choice. From these images and assuming the correct flight path is used, highly accurate measurements and visual recognition can be performed. Additionally, Computer Vision AI can be applied to these images to automate the inspection process.
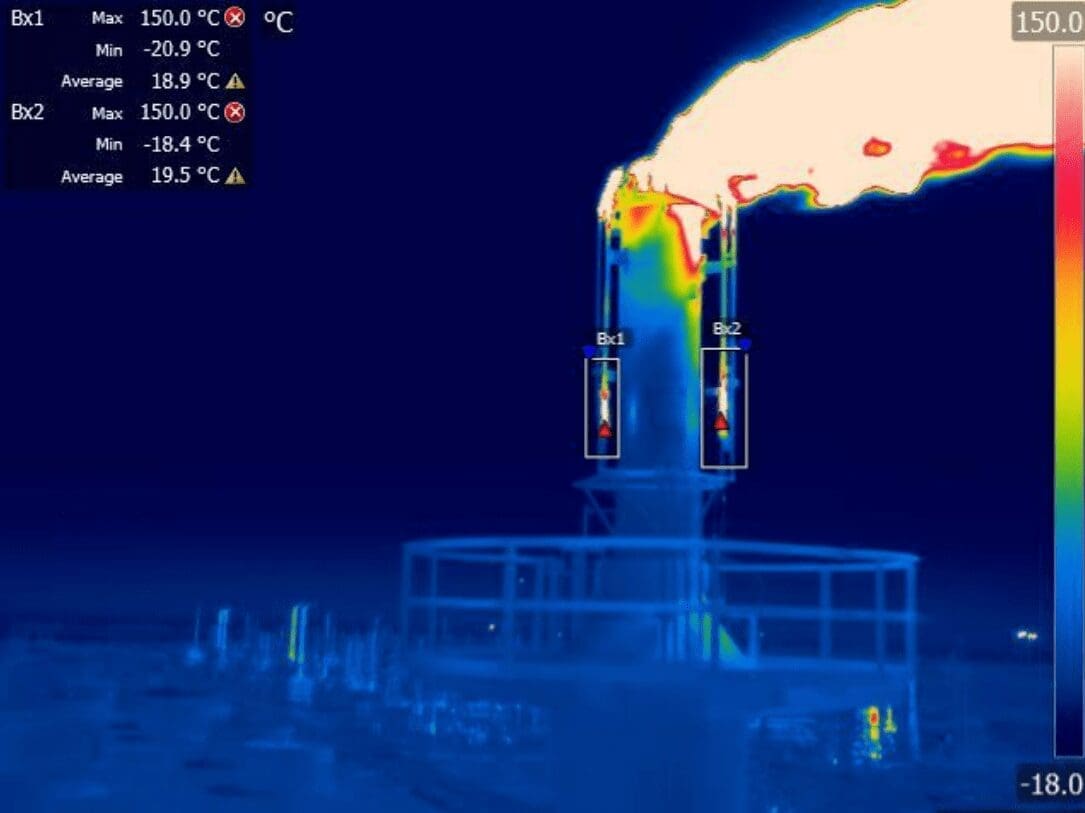
Figure 4: Thermal sensor data can be uploaded into the Optelos inspection data management system for AI-enabled leak detection, monitoring for temperature variations and abnormal operating conditions.
- Analyzing your data for insights and decisions: Once the images have been collected using the correct flight path and the sensor best suited for that asset, there are a variety of analysis methods that can be utilized to identify changes in asset condition. Photogrammetry or LiDAR generated 3D Point Clouds, create a “real world” 3D Digital Twin (point cloud) of an asset. These Digital Twins allow highly accurate measurements to be performed and a variety of asset conditions to be identified and monitored. When 3D Digital Twin point clouds are generated over a fixed timeline and compared, variations such as dimensional changes, and corrosion can be easily identified and mitigated before they are service impacting or create safety or compliance issues. With centimeter level accuracy, 3D Point Clouds also serve the basis for performing any detailed measurements on the asset for material and repair planning.
- Workflow integration and organizational adoption: Sustainable improvements are not fully realized until this new visual data and the inspection results are part of an end-to-end workflow that puts the right data in the hands of the right people at the point of impact. This mean employing a system that that allows the pertinent inspection data, geolocation information and any other pertinent repair and asset data to be associated with the specific dispatch event or generated trouble ticket. In that way, the repair technician and inspection teams have all the data they need to appropriately plan for the repair activity and more rapidly mitigate the issue. This provides significant improvement in repair time and can also provide significant improvement in inventory of repair materials.
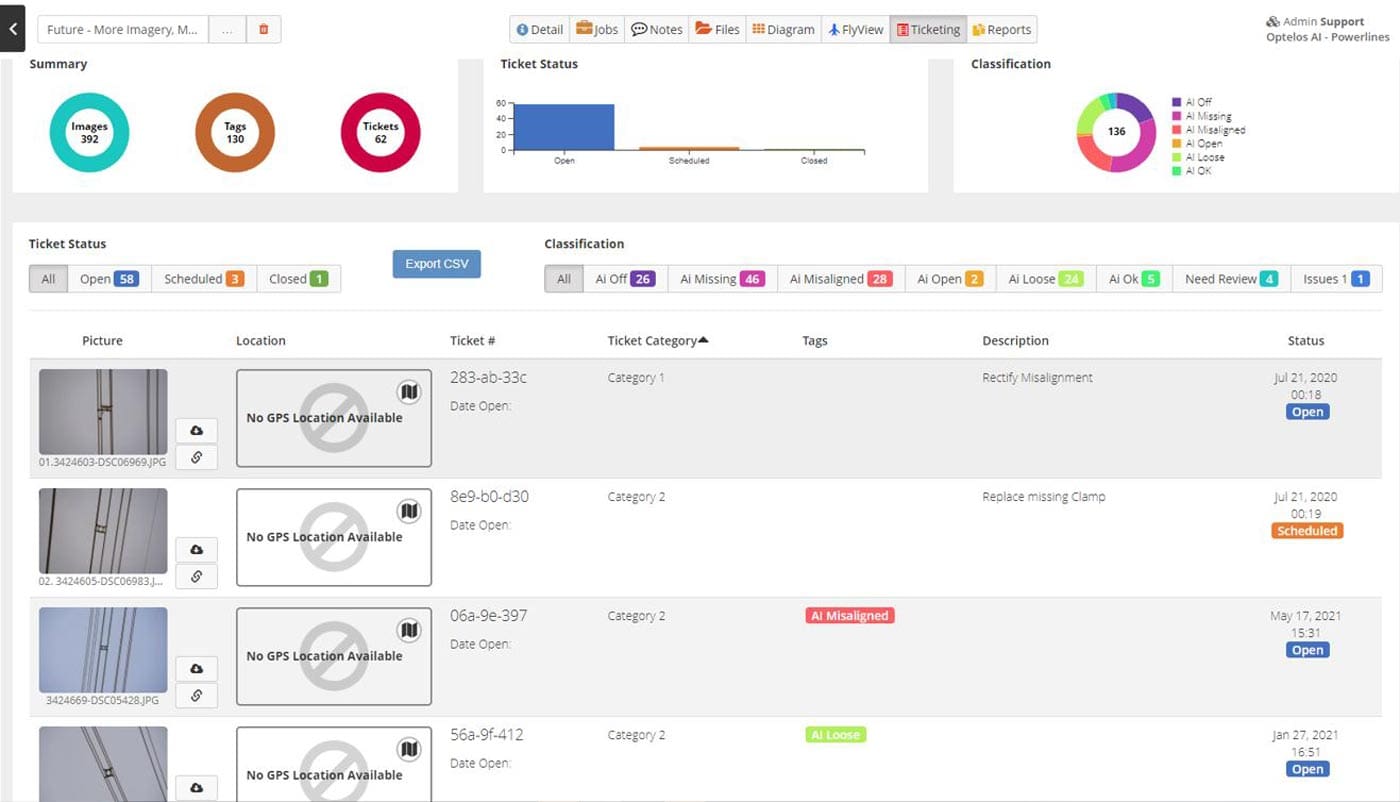
Figure 5: Workflow integrations with trouble ticketing and dispatch systems can automate repair action, resource planning and ops team manpower balancing.
In summary – it’s all about the data
In order to get the most out of your UAV program and to turn the vast amounts of collected data into actionable insights and sustainable results, you will do well to follow these guidelines for effective data management. No drone-based digital transformation in manufacturing inspection program exactly matches another, as each program has its own starting point, unique goals and challenges that are specific to the application and inspection circumstances. Following the above best practices, however, will ensure that your program will avoid the typical pitfalls plaguing many enterprises and ensure you have a much higher likelihood of more quickly achieving success and organizational adoption than the typical new technology installation. If you would like a free consultation with an Optelos solutions expert on how to set up your drone inspection program for optimal data leverage and insights, please click the “Get Started” button below, and we’ll be happy to assist you in your digital transformation in manufacturing journey.
